
Get a piece of wood, 1.75" x .75" x 2'.
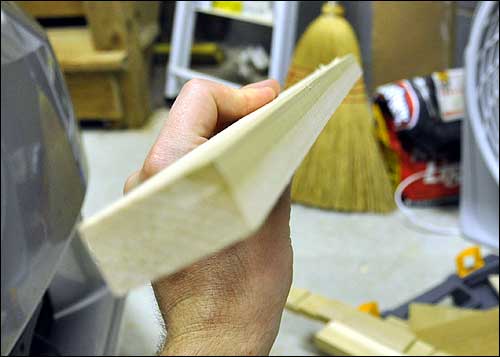
Call this the "neck". I used poplar, next time I won't. You might be better off with a hardwood like oak or maple. You can get poplar or oak at any big-box hardware store. It's really cheap. Poplar cuts like butter, which is great if you're using hand tools.
Get some more wood, 1.75" x .25", build a box. For the back, use a .25" x 5.5" (?) board - I forget the exact dimensions of these boards - but they're the thin and wide boards, obviously. Cut the back first and use it as a template to build the sides. Don't attach the back yet though.
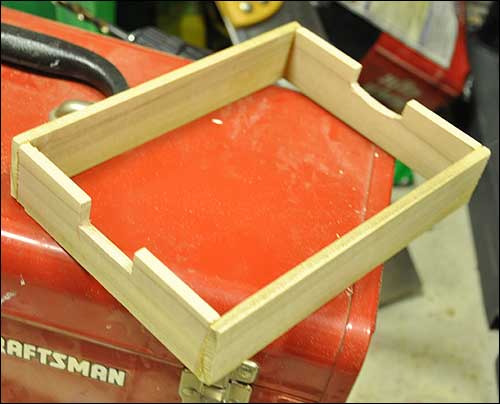
Make some cut-aways on the ends, roughly .5" deep x 1.75" wide. The neck is going to fit into these.
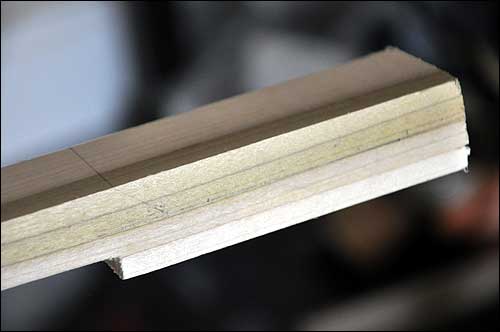
Leaving about an inch on one end of the neck, cut two notches: 1/4" x 1/4"- these will fit into the cut-aways you made on the body. When you put the body and the neck together, the neck sit flush with the top of the body.
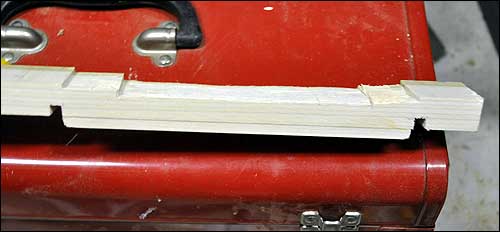
Also, cut out 1/16" of wood from the top of the neck, in the section where the neck is inside the body. An inch or so inside that, cut another 1/16 out. That extra 1/4" chunk of wood glued to the bottom doesn't really need to be there - let's just say it's "for weight".
You can also take the corners off the back of the neck with a hand plane and a file. Just round them down a bit. It will make a huge difference.
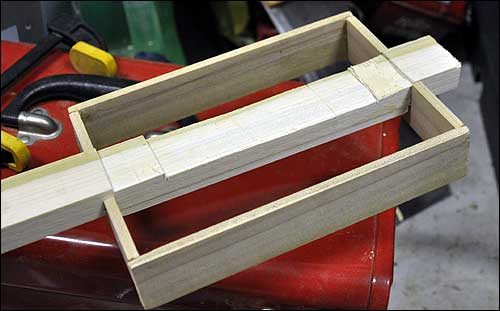
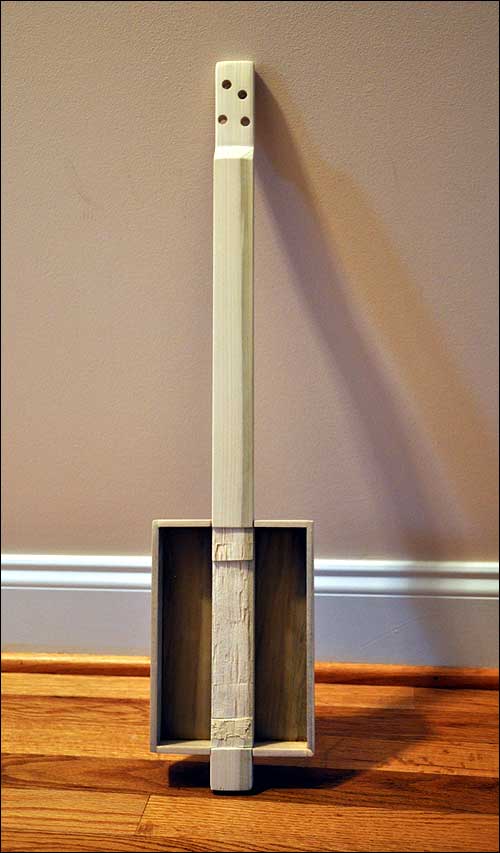
See how they fit together ?
Up on the other end of the neck, glue a 4" section of the 1/4" stock to the bottom of the neck.
Then draw a cut-away on the top (the pencil lines - the horizontal one runs along the white/green stripe). This is going to ensure that the tuning pegs are recessed below the fretboard. The little board on the bottom is to provide enough thickness to accommodate the tuners, and to provide some extra strength.
Cut away where you marked.
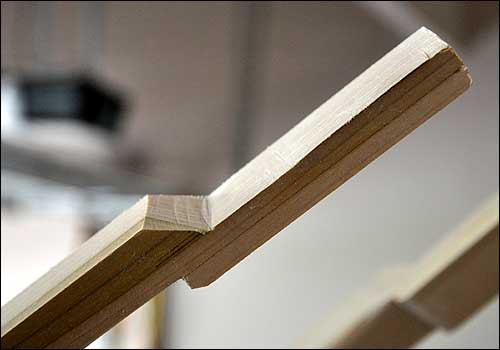
File and sand, to get rid of the saw marks.
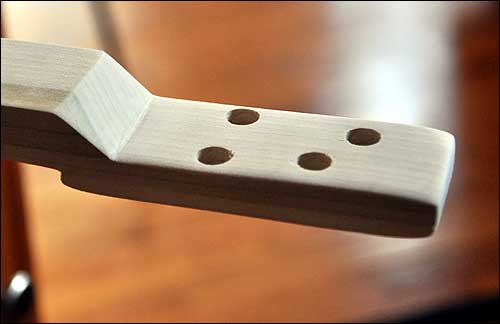
Work out a layout for your tuning machines. This board is really narrow, so you're going to have to be creative in how you position them. Drill-out the holes. My tuners had 3/8" barrels, so that's how big the holes are.
Glue the back to the body. Since you used that piece of wood as a template, it should fit snugly into the sides of the body.
The top of the neck inside the body is pretty rough, because maybe you used a chisel to make the 1/16" cuts. But that's OK - it will be hidden.
You might want to add some strips of wood around the top inside edge of the body, 1/16" below the top, for the top to rest on.
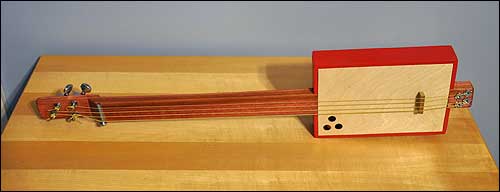
Get some stain, some poly, and some spray paint. Paint the pieces/parts. "Sonoma Redwood" and "Candy Apple Red" might work.
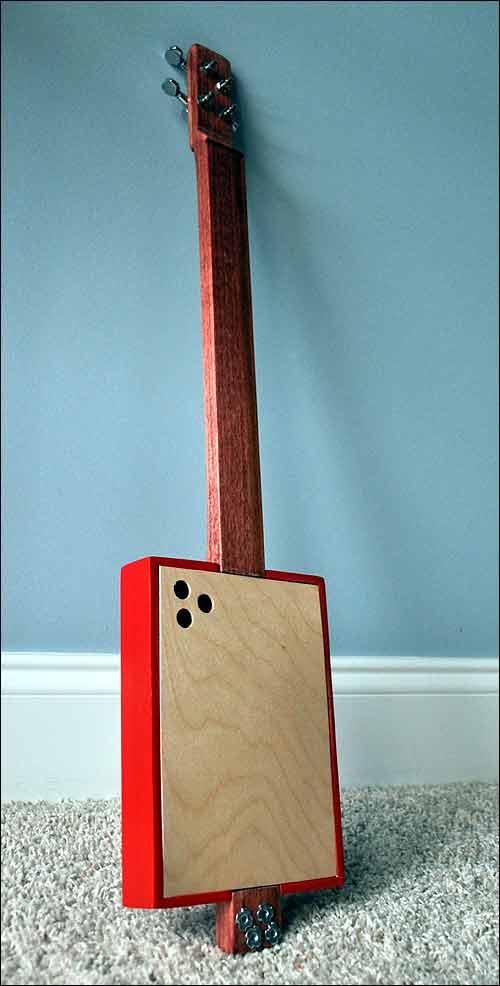
For the top, you should use 1/16" birch plywood that you bought from a place that sells wood for model airplanes. Add sound-holes. Attach your tuners. For the tailpiece, drill four small holes and stick tee nuts into the front and back, to keep the strings from cutting through your precious wood.
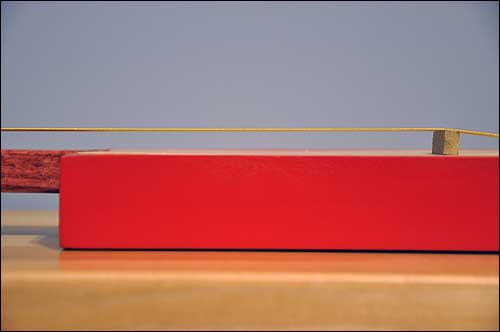
All that's left now is finding something to use for the nut and the bridge.
You could use a machine screw for the nut: file out a little channel at the top of the neck, for the screw to rest in. Or you could use a piece of Corian, or hard plastic, or hard wood - anything hard that you can shape really.
For the bridge, a little piece of wood, slotted on top with a file, will work.
Don't make it too tall, though.
And, before you glue the top on, you will want to hot-glue a contact microphone to the bottom side of the top, just below where you're going to put the bridge. Be sure to stick a 1/4" guitar jack somewhere on the end of the body. This isn't going to be loud enough to play without amplification.
Don't bother with frets. Just tune it to an open chord and use a slide.
When you're done, you should call it The Red Menace.
I guess this falls into the "cigar box guitar" category, but obviously the box isn't a cigar box.
What you'll need:
Poplar boards for the body sides (and various other bits): 3' x 1.75" x .25"
Poplar board for the back of the body: 1' x 5.5" (?) x .25" (whatever width the store sells will be fine).
Poplar (or oak) for the neck: 3' x 1.75" x .75"
1/16" birch plywood.
8 Tee nuts
1 Contact mic
1/4" guitar jack
Guitar tuning machines (2,3 or 4 - your choice!). If you buy these new, they will cost much more than all the rest of the stuff, combined.
Drill
Coping saw
Wood file
Wood chisel
Wood glue
Sandpaper
Stain, paint, polyurethane
Patience
That's if you want to build a Red Menace. But you probably don't want to do that. There should be only one.
This would be a thousand times easier with a proper set of power tools and a work bench. But I did it all by hand, sitting on the garage floor.
Neato! How’s it sound?
it’s strange. :)
it has very little acoustic volume (expected, since it’s so small), and very little sustain (not sure why). i’m going to experiment with different bridge and nut shapes and materials to see if i can increase the sustain. perhaps the bridge is too soft? would a hardwood neck be better?
the action is definitely too high right now. but shorter bridge and nut should help there.
the contact mic is reallllly hot though. and plugged-in, the thing is plenty loud (and feeds back effortlessly).
but, it was my first try. so i wasn’t expecting perfection.
i’ll post some audio, later.
How is the box joined together? Just glued up endgrain-to-long? I can’t see what is keeping the sides of the box from falling off.
Just glued up endgrain-to-long?
yep.
the bottom of the box (.25″ thick also) fits snug inside the sides, and is glued in place. so it does a lot to keep the box in shape. the top is just resting there (and is too thin to do anything anyway). but there’s really no stress on the box itself, so i didn’t bother trying to make it very strong.
also… there are some little pieces of wood in the corners (which i didn’t show here) which are ostensibly there to support the top, but are also acting as braces.
you should use better strings, actual metal ones for acoustic guitar. that’ll give you most of the sustain you’re looking for. The plastic crap you used damps a lot of the vibration.
If you go for strats, try using copper. Also your bridge is not making perfect contact with the body. you should file an angle to the bottom side for it to contact 100% with your resonance box.
Is there full contact between the lid and the neck?
What type of wood is the lid anyway? try building a thin wooden box around your frame for better acoustic, your current frame is too rigid for any sweet frequencies to catch on.
The plastic crap you used damps a lot of the vibration.
no plastic on the Red Menace. i used electric guitar strings (steel).
Is there full contact between the lid and the neck?
no. there’s really no direct contact at all between the lid and neck. the lid is attached to the sides of the box and the neck is attached to the front and back sides.
i currently have a little triangular bridge on there – it’s much shorter than the one in the picture, and does make full contact with the lid. it helps a bit.
What type of wood is the lid anyway?
1/16″ birch plywood (model airplane grade)
try building a thin wooden box around your frame for better acoustic, your current frame is too rigid for any sweet frequencies to catch on.
that’s what i was thinking – don’t see many acoustic guitars with 1/4″ sides. i’ve got enough of that plywood left that i could use that for the sides of a box.
i’d like to try an oak neck, too. the poplar seems a bit too flexible (bows a little when i tune the strings high).