
This is my sourdough recipe.
- 4.5 cups of flour
- 2 cups water
- 1 cup of active sourdough starter
- 2 teaspoons salt
Makes 2 loaves.
For flour, I typically use 3 cups King Arthur white bread flour + 1 cup whole wheat flour + .5 cups dark rye flour.
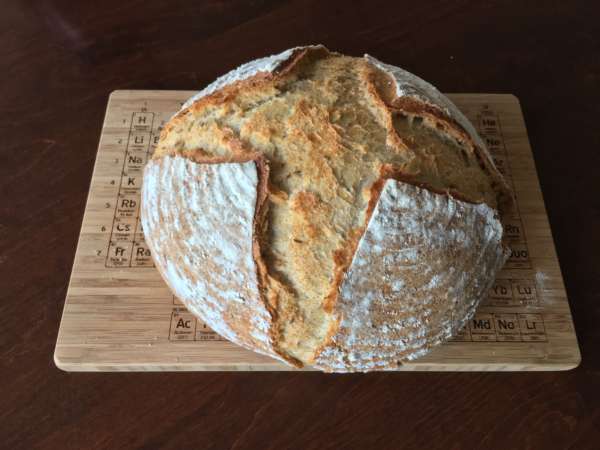
The loaf in the picture was probably made with an all-white starter. These days, my starter is fed with wheat flour so the loaves come out fairly whole-wheat-dark.
Night before baking (this is always Saturday, 10:00pm), mix water & starter, then add 3 cups of flour (1.5 cups white + wheat + rye, or whatever your mix is). Cover. Put this somewhere coolish to sit overnight (<70 degrees if possible).
I actually mix the stuff in a 6 quart bucket, and then put that inside a 12 quart bucket with a big handful of ice on the bottom. Then cover that.
Next AM (9:00ish), add salt and one and a quarter cups more of flour. Mix it all up, let it sit for 10 minutes. This gives the flour time to absorb the water completely (this is the 'autolyse' method). After that, if the dough is still too sticky, add more flour.*
At this point, you can knead if you want. Or, you can do what I do, and use Ken Forkish's stretch-and-fold method. Big ball of dough in the bucket, grab one side and pull up a bit - less than a foot. Fold that back down onto the ball, rotate 90 deg, pull again. Rotate, pull again. And once more. Repeat the pull and stretch process at 20 minutes and again at 40 minutes.
After mixing, let the dough sit for 4 hours in its bucket, in a cool place, covered.
Scoop the dough out of its bucket onto a clean floured surface. Divide the dough in half. Shape each half into a ball. This is another bit that took me a while to figure out. Shaping is very important. Without shaping, the dough will not become a nice round loaf. It will become a hard, ugly lump.
My shaping method is pretty simple:
- Grab the ball of dough
- Hold it in my upturned hands as if I'm offering it to someone
- Hold the dough on my fingers and rotate both wrists outward. My thumbs pull the sides down, gently. This stretches the top. And my fingers tuck the excess back into the bottom of the ball
- Rotate the ball horizontally a little after each stretch to get a nice even shape all around.
- Be gentle. Don't squeeze.
- This should only take a few seconds.
Now, proofing. This is the final rest before baking. I use a floured wicker proofing basket for this. A lightly-greased steel mixing bowl will also work. The dough ball I just shaped goes top-down into the basket. And it sits there for 45 minutes or so.
I bake in a cast-iron dutch oven (D.O.). Preheat the D.O. and its lid, in the oven @ 425. When it's pre-heated, take the (FLAMING HOT) D.O. out of the oven, put it on the stove and quickly throw a sprinkle of cornmeal into the bottom (keeps the dough from sticking), then gently and carefully place the dough ball into the D.O., top-side up. Grab the sharpest knife available and cut a wide "X" into the top of the ball. This gives the loaf a place to expand. If you don't do this, it will pick its own place to expand, which can be dramatic if it picks a nice place, but it also might just refuse to expand. And then you will have lots of croutons and bread crumbs.
Into the oven, put the (HOT) lid on the D.O.. 30 minutes.
After 30 minutes, take the lid off but leave it in the oven. Turn the temp down to 375. Another 15 minutes, or until the crust is dark but obviously not burned.
Now repeat with the other dough ball.
* - this is the part that took me the longest to learn. "Too sticky" is very subjective. The dough should hold together, but it shouldn't tough and leathery.